Here's the Hidden Things:
1. INSTALLER MUSIC :Start>run>"c:\\windows\system32\oobe\images\title.wma">hit enter
2. HIBERNATE :Start>turn off computer>press shift key to change the "Stand By" button to hibernate
3. HIDDEN DEVICES :Control pannel >system>hardware>device manager>select "view" and show hidden device
4. CHARACTER MAP :Start>run>"charmap.exe">ok
5. CLIPBOARD VIEWERS :Start>run>"clipbrd.exe">ok
6. Dr. WATSON :Start>run>"drwtsn32.exe">ok
7. IEXPREE WIZARD :Start>run>"iexpress.exe">ok
8. WINDOW MEDIA PLAYER 5.1 :Start>run>"mplay32.exe">ok
8. WINDOW MEDIA PLAYER 6.4 :Start>run>"mplayer2.exe">ok
9. ODBC DATA SOURCE ADMINIS. :Start>run>"odbcad32.exe">ok
10.OBJECT PACKAGER :Start>run>"packager.exe">ok
11.SYATEM MONITOR :Start>run>"perfmon.exe">ok
12.NTW SHARE FOLDER WIZARD :Start>run>"shrpuwb.exe">ok
13.FILE SIGNATURE VERI. TOOL :Start>run>"sigverif.exe">ok
14.SYS CONFIGURATION EDITOR :Start>run>"sysedit.exe">ok
15.DRIVER VERIFIER MANAGER :Start>run>"verifier.exe">ok
16.WINDOWS 4 WORKGROUP CHAT :Start>run>"winchat.exe">ok
17.PRIVAET CHRACTER OR GRAPHIC EDITOR :Start>run>"eudcedit">ok
18.ADD OR REMOVE PROGRAMS :Start>run>"appwiz.cpl">ok
19.DIRECT X DIAGANOSIS :Start>run>"dxdiag">ok
Tuesday, February 3, 2009

Method to enable Task Manager in a System
PROCEDURE
You have to use Group Policy Editor for Windows XP Professional to enable it.
• Click Start>Run>type gpedit.msc and hit Enter.
• Navigate to this line:
User Configuration >> Administrative Templates >> System >> Ctrl+Alt+Delete Options >> Remove Task Manager
• Double-click the Remove Task Manager option.
• Set the policy to “Not Configured”.
Yahoo Messenger trick-How to open Multiple Yahoo msngr
1. Go to start > Run and Type regedit then Press Enter
2. Click on the plus sign near the folder HKEY_CURRENT_USER
3. Click on the plus sign near the folder Software
4. Click on the plus sign near the folder Yahoo
5. Click on the plus sign near the folder Pager
6. Right Click on the folder name Test > New > DWORD Value
7. Right side you will get a file named New Value #1
8. Right Click on the file New Value #1 and Rename it as Plural and press enter
9. Double Click on the file Plural
10. You will get a window named Edit DWORD Value
11. Type 1 inside 'Select the Value data' and press enter
12. Close the registery editor window
13. Now you can launch multiple windows and use different ID's.
NOTE: Where the Symbol (>) represents Goto (or) Select
2. Click on the plus sign near the folder HKEY_CURRENT_USER
3. Click on the plus sign near the folder Software
4. Click on the plus sign near the folder Yahoo
5. Click on the plus sign near the folder Pager
6. Right Click on the folder name Test > New > DWORD Value
7. Right side you will get a file named New Value #1
8. Right Click on the file New Value #1 and Rename it as Plural and press enter
9. Double Click on the file Plural
10. You will get a window named Edit DWORD Value
11. Type 1 inside 'Select the Value data' and press enter
12. Close the registery editor window
13. Now you can launch multiple windows and use different ID's.
NOTE: Where the Symbol (>) represents Goto (or) Select
How to get the Win XP's Product key from CD, If u doesn't know the key
PROCEDURE:
1. Open XP Installation CD
2. Explore i386 folder
3. Find UNATTEND.txt file and open it.
4. Goto end and find the CD Key (Product Key).
1. Open XP Installation CD
2. Explore i386 folder
3. Find UNATTEND.txt file and open it.
4. Goto end and find the CD Key (Product Key).
Make your windows startup services faster and safer
PROCEDURE:
Open Run and type MSConfig and goto "Services" Tab and then Unslect the following services :
Alerter
Clip book
Messenger
Net Log on
Net meeting
Remote Desktop Sharing
Remote Desktop Help
Session Manager
Remote Registry
Routing & Remote Access Server
Telnet
Wireless Zero Configuration (if no wireless network)
If you use a Single / Standalone PC, the above mentioned services are not required while start up. This changes will make your pc's booting time less.
Monday, February 2, 2009
How the Proxy Server works
A Proxy Server is a computer that offers network and internet access services to the client computers in a network. A proxy is a stand-in for you - someone who does something on your behalf. A proxy server is a kind of stand in for your computer. In an enterprise that uses the Internet, a proxy server is a server that acts as an intermediary between a workstation user and the Internet so that the enterprise can ensure security, administrative control, and caching service.

By using the proxy server you can hide, conceal and make your network id anonymous by hiding your IP address. A proxy server is associated with or part of a gateway server that separates the enterprise network from the outside network and a firewall server that protects the enterprise network from outside intrusion. In short, a Proxy Server can be described as 'A server that sits between a client application, such as a Web browser, and a real server.' To get the anonymous status on the network or Internet, strong intermediate methods are employed like cryptography etc.
How does Proxy Server works?
A proxy server receives a request for an Internet service (such as a Web page request) from a user. If it passes filtering requirements, the proxy server, assuming it is also a cache server , looks in its local cache of previously downloaded Web pages. If it finds the page, it returns it to the user without needing to forward the request to the Internet. If the page is not in the cache, the proxy server, acting as a client on behalf of the user, uses one of its own IP addresses to request the page from the server out on the Internet. When the page is returned, the proxy server relates it to the original request and forwards it on to the user. A good example, and the one you probably see the most, is a web proxy. When configured to use a proxy, your web browser contacts the proxy server for each web access instead of going directly to the target server on the internet. The proxy server then turns around and makes the "real" request of the web server. The proxy server gets the response, and then passes it back to you.
There is a large number of the software available that allows you to hide your IP address with the help of the proxy servers. The well known software for this purpose is Hide IP, Stealth surf, Netconceal, Anonymous surfing, Proxify and Ghost surf. To the user, the proxy server is invisible; all Internet requests and returned responses appear to be directly with the addressed Internet server. (The proxy is not quite invisible; its IP address has to be specified as a configuration option to the browser or other protocol program.)
Types of Proxy Servers
Many different types of Proxy Servers are available. Some common types are-
- FTP
- HTTP
- Gopher
- IRC
- MSN
- AIM
- ICQ
- VOIP
- SSL
A proxy server can be split into another two Categories:
- Anonymous
An Anonymous Proxy Server blocks the remote Computer from knowing the identity of the Computer using the Proxy Server to make requests. - Transparent
A Transparent Proxy Server tells the remote Computer the IP Address of your Computer. This provides no privacy.
Anonymous Proxy Servers can further be broken down into two more categories, Elite and Disguised. An Elite Proxy Server is not identifiable to the remote computer as a Proxy in any way. A Disguised Proxy Server gives the remote computer enough information to let it know that it is a Proxy, however it still does not give away the IP of the Computer it is relaying information for.
There is a advantage using Proxy Servers.
Improve Performance: Proxy servers can dramatically improve performance for groups of users. This is because it saves the results of all requests for a certain amount of time. Consider the case where both user X and user Y access the World Wide Web through a proxy server. First user X requests a certain Web page, which we'll call Page 1. Sometime later, user Y requests the same page. Instead of forwarding the request to the Web server where Page 1 resides, which can be a time-consuming operation, the proxy server simply returns the Page 1 that it already fetched for user X. Since the proxy server is often on the same network as the user, this is a much faster operation. Real proxy servers support hundreds or thousands of users. The major online services such as America Online, MSN and Yahoo, for example, employ an array of proxy servers.
Run multiple operating systems without MultiBooting
MultiBooting is a technique used to run two or more operating systems on a single computer. Some people choose to set up a MultiBoot computer to run older programs that require an earlier operating system to operate properly. However, MultiBooting can be complicated and, if not done properly, can render your system inoperable.
An easy way to enjoy the benefits of multibooting without the pitfalls is to use Virtual PC 2007. It's a free download from Microsoft you can use to install multiple operating systems on your computer, and then switch between them as easily as you switch between programs.
You can download Virtual PC 2007 from the Microsoft Virtual PC 2007 website.
How to set up a virtual machine
Follow the instructions on your screen to install the program.
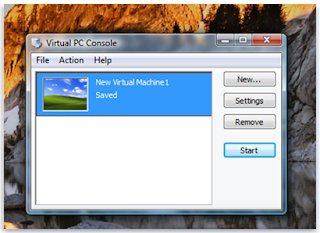


After installation is complete, you'll create a virtual machine and a virtual disk for it to use. (Each virtual machine requires at least one virtual hard disk.) You can then install your additional operating system on the virtual machine. You'll need the installation disc or other installation media for the operating system and a valid product key.
If you no longer want the virtual machine on your computer, or want to reclaim the disk space used by the virtual hard disk, you can delete the virtual machine files in the My Virtual Machines folder, which is created in your Documents folder on the host computer when you install Virtual PC 2007. If you delete a virtual hard disk, any data stored on the virtual hard disk will also be deleted. Be sure to save any data that you want to keep to another location before you delete the virtual hard disk.
To create a virtual machine and a virtual disk on the host computer
To install an operating system on the new virtual machine
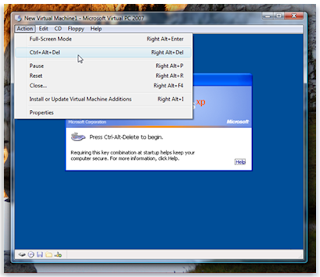
Now that the virtual machine is running your new operating system, you can install programs and create files, just as if it were a separate physical computer. For additional information on using Virtual PC 2007, open Virtual PC 2007, click Help and then click Virtual PC Help.
An easy way to enjoy the benefits of multibooting without the pitfalls is to use Virtual PC 2007. It's a free download from Microsoft you can use to install multiple operating systems on your computer, and then switch between them as easily as you switch between programs.
You can download Virtual PC 2007 from the Microsoft Virtual PC 2007 website.
How to set up a virtual machine
Follow the instructions on your screen to install the program.

After installation is complete, you'll create a virtual machine and a virtual disk for it to use. (Each virtual machine requires at least one virtual hard disk.) You can then install your additional operating system on the virtual machine. You'll need the installation disc or other installation media for the operating system and a valid product key.
If you no longer want the virtual machine on your computer, or want to reclaim the disk space used by the virtual hard disk, you can delete the virtual machine files in the My Virtual Machines folder, which is created in your Documents folder on the host computer when you install Virtual PC 2007. If you delete a virtual hard disk, any data stored on the virtual hard disk will also be deleted. Be sure to save any data that you want to keep to another location before you delete the virtual hard disk.
To create a virtual machine and a virtual disk on the host computer
- Click Start, click All Programs, and then click Microsoft Virtual PC.
- In the New Virtual Machine Wizard, click Next.
- Select Create a virtual machine, and then click Next.
- Type a name for the virtual machine, and then click Next.
- In the Operating system list, select the operating system you plan to install, and then click Next.
- Click Using the recommended RAM, and then click Next.
- Click A new virtual hard disk, and then click next.
- Type a name for the new virtual hard disk, and then click Next.
- Click Finish. The Virtual PC Console will display the virtual machine you just created.
To install an operating system on the new virtual machine
- In Virtual PC Console, click the virtual machine you want to install the operating system on, and then click Start.
- Because no operating system is installed yet, you'll see the following message: Reboot and Select proper Boot device or Insert Boot Media in selected Boot device.
- Ensure that the virtual machine window is the active window on your desktop, insert the installation disc for the operating system into the CD or DVD drive, and then press Enter.
- The installation should begin within the virtual machine window. Follow the instructions that will appear to install the operating system.
- To log in to the new virtual machine, click Action, click Ctrl+Alt+Del, type your user name and password, and then click Enter.

Now that the virtual machine is running your new operating system, you can install programs and create files, just as if it were a separate physical computer. For additional information on using Virtual PC 2007, open Virtual PC 2007, click Help and then click Virtual PC Help.
Tricks for China Mobile
China Mobile Secret Codes :
Default user code : 1122, 3344, 1234, 5678
Engineer mode : *#110*01#
Factory mode : *#987#
Enable COM port : *#110*01# -> Device -> Set UART -> PS Config -> UART1/115200
Restore factory settings : *#987*99#
LCD contrast : *#369#
Software version : *#800#
Software version : *#900#
Set default language : *#0000# Send
Set English language : *#0044# Send
Set English language (new firmware) : *#001# Send
Default user code : 1122, 3344, 1234, 5678
IMEI *#06#-
For version code and all *#87*#
For test *#66#-
Default user code : 1122, 3344, 1234, 5678
Engineer mode : *#110*01#
Factory mode : *#987#
Enable COM port : *#110*01# -> Device -> Set UART -> PS Config -> UART1/115200
Restore factory settings : *#987*99#
LCD contrast : *#369#
Software version : *#800#
Software version : *#900#
Set default language : *#0000# Send
Set English language : *#0044# Send
Set English language (new firmware) : *#001# Send
Default user code : 1122, 3344, 1234, 5678
IMEI *#06#-
For version code and all *#87*#
For test *#66#-
Tips to recover scratched CDs.Dvds etc
Here is the entire procedure, which might give you the desired results. Rub a small amount of toothpaste on the scratch and polish the CD with a soft cloth and any petroleum-based polishing solution (like clear shoe polish). Squirt a drop of Brasso and wipe it with a clean cloth.
Technology to the rescue
There are many softwares available on the net, which enable the recovery of the CD data. BadCopy Pro is one such software, which can be used to recover destroyed data and files from a range of media.
Just a few clicks is all it requires to recover the disc from almost all kind of damage situation; be it corrupted, lost data, unreadable or defective.
DiskDoctors is another popular company, which offers both software and solutions to recover data from a scratched CDs and DVDs.
General Tips:
* Always wipe the CD from the center outward with stratight spoke-like strokes. Wiping CDs in circles will create more scratches.
* Do not scratch the graphics layer as you cannot repair the disc. HINT: Hold the disc up to a light with the graphics layer facing the light source. If you can see light thru the scratches at any point then the disc may be irreparable and or exhibit loading or playing errors.
* Clean your Disc players lens regularly with a suitable product to ensure optimal viewing pleasure.
* Make sure to use a soft, lint-free cloth to clean both sides of the disc. Wipe in a straight line from the centre of the disc to the outer edge.
* If wiping with a cloth does not remove a fingerprint or smudge, use a specialized DVD disc polishing spray to clean the disc.
* Only handle the disc by its outer edge and the empty hole in the middle. This will help prevent fingerprints, smudges or scratches.
Statistics:
*Fingermarks/prints cause 43% of disc problems!
* General wear & tear causes 25% of disc problems!
* Player-related issues cause 15% of disc problems!
* User-related issues cause 12% of disc problems!
* PlayStation 2 machine scratches cause 3% of disc problems!
* Laser rot (a manufacturer error) causes 2% of disc problems!
Technology to the rescue
There are many softwares available on the net, which enable the recovery of the CD data. BadCopy Pro is one such software, which can be used to recover destroyed data and files from a range of media.
Just a few clicks is all it requires to recover the disc from almost all kind of damage situation; be it corrupted, lost data, unreadable or defective.
DiskDoctors is another popular company, which offers both software and solutions to recover data from a scratched CDs and DVDs.
General Tips:
* Always wipe the CD from the center outward with stratight spoke-like strokes. Wiping CDs in circles will create more scratches.
* Do not scratch the graphics layer as you cannot repair the disc. HINT: Hold the disc up to a light with the graphics layer facing the light source. If you can see light thru the scratches at any point then the disc may be irreparable and or exhibit loading or playing errors.
* Clean your Disc players lens regularly with a suitable product to ensure optimal viewing pleasure.
* Make sure to use a soft, lint-free cloth to clean both sides of the disc. Wipe in a straight line from the centre of the disc to the outer edge.
* If wiping with a cloth does not remove a fingerprint or smudge, use a specialized DVD disc polishing spray to clean the disc.
* Only handle the disc by its outer edge and the empty hole in the middle. This will help prevent fingerprints, smudges or scratches.
Statistics:
*Fingermarks/prints cause 43% of disc problems!
* General wear & tear causes 25% of disc problems!
* Player-related issues cause 15% of disc problems!
* User-related issues cause 12% of disc problems!
* PlayStation 2 machine scratches cause 3% of disc problems!
* Laser rot (a manufacturer error) causes 2% of disc problems!
Boot Windows XP from Compact Flash Card
Develop an operating system using a hard drive:
- Your operating system i.e Windows XP will be requiring 1.5Gigs of hard drive memory, so the initial step is to create the system using a typical standard hard drive.
- Try to Create a partition of 2 Gigs, but it is not possible to install windows xp service pack 2 at this stage, so put the Operating system on a 3 Gigs or bigger drive for proceeding in a successive manner .
- After the above step, Install a new copy of the Operating system using NTFS file system since it has option of minimizing the file contents which is to be used by the user at later stages.
- Make the addition through drivers and wait for appropriate time so that Windows Update will install and place latest patches.
- make an Installation of Beyond TV Link and the Firefly Remote software.
- Try to keep a track or a record that the above procedures are been followed in an appropriate manner and they are functioning properly.
- Right now at this stage it is not so possible or preferable to back up everything using any tool like Partition Magic.
In case you want to roll back to this stage; follow the below given steps with at most care:
- Initially you should turn off virtual memory so it does not create a paging file on the drive. This can be applied by right clicking My Computer and selecting Properties. It’s below the Advanced Tab, insert into another dialog by selecting the Settings button below Performance.
- From there, it’s below yet another Advanced tab and it’s labeled Virtual Memory .
- Make sure that when you select No paging file you hit the Set button or it will not adjust the settings.
- The next step is switching back the OS using XP Lite from Lite PC.
- Here you should do is disable Windows File Protection in the option named Window File Protection tab .
- If you are not able to, then you’ll find windows constantly complaining about missing files.
- Then remove most components including those Advanced Components you can get to show up by changing the default settings .
- since you’ll likely remove the System Restore feature which gobbles up a lot of space, but prevents you from doing something completely irreversible.
- Make sure you reboot a couple times afterwards to remove any system restore points.
- The next step to follow is to boot into Windows Safe Mode to do some basic clean up of the system.
- make it a confirm to change file explorer to show hidden and system files. This can be found in the Folder Options menu in the View tab.
- Delete anything in the Windows directory that starts with NT Uninstall.
- Delete anything in the Windows/Software Distribution/Download directory.
- On larger directories, go to the properties dialog and select the Advanced button and go for compress contents to save disk space. Note that this will be only available if you format your drive using NTFS.
- Try doing this to the following folders: Program Files, Windows/Microsoft.NET, Windows/.inf, Windows/system32.
- Doing just that, the system down to 750MB or so.
- Run floppy boot disks for Partition Magic to resize and move the OS to the compact flash card.
- Make sure you compress the hard drive partition small enough to fit the compact flash card, and then from within Partition Magic, copy the drive over to the compact flash drive.
- Concluding step is to dismental the original hard drive and switch the connectors so it puts the compact flash drive in its place.
- Try to get confirmed that it's in the same location on the ID Bus (e.g Master Drive, Primary IDE channel) or you have to quickly run into a NT loader is missing error.
- Definitely, it will boot up as it did before, a lot more quietly than that squeaky old disk you were using before.
Tips for Increase Broadband speed
1> Type "about:config" into the address bar and hit return. Scroll down and look for the following entries:
network.http.pipelining network.http.proxy.pipelining network.http.pipelining.maxrequests
Normally the browser will make one request to a web page at a time. When you enable pipelining it will make several at once, which really speeds up page loading.
2> Alter the entries as follows:
---------------------------------------------------------------------------------------------------------------------------
- Set "network.http.pipelining" to "true"
- Set "network.http.proxy.pipelining" to "true"
- Set "network.http.pipelining.maxrequests" to some number like 30.
3> Lastly right-click anywhere and select
New-> Integer. Name it "nglayout.initialpaint.delay" and set its value to "0".
---------------------------------------------------------------------------------------------------------------------------
This value is the amount of time the browser waits before it acts on information it receives.
Airtel GPRS on Linux with Nokia Phone
You need to download wvdial for ubuntu which is a PPP dialer.
install the wvdial package & do the following configurations :
Code:
install the wvdial package & do the following configurations :
- Open terminal and type "wvdialconf" without quotes. This searches for the modem and writes a config file to the /etc/wvdial.conf.
- open this file "/etc/wvdial.conf" with administrators rights so that u can save changes made to it.
- replace the entire content with the following code :
Code:
[Dialer Defaults]
Init1 = AT+CGDCONT=1,”IP”,”airtelgprs.com”,”",0,0
Init2 = ATQ0 V1 E1 S0=0 &C1 &D2 +FCLASS=0
stupid mode = 1
Modem Type = USB Modem
Baud = 460800
New PPPD = yes
Modem = /dev/ttyACM0
ISDN = 0
Phone = *99#
Password = TechArena
Username = TechArena
- now save the "wvdial.conf" file that u just modified.
- now open terminal and type wvdial.
- you are connected!
Differences Between Windows Vista and Windows 7
1. Updated and Improved UAC - One of the biggest problems Windows Vista had with the much-beleagered operating system was its "improved" UAC, which ended up pestering users every time they wanted to install a program or change settings, as the screen would temporarily go black before displaying a message confirming the user's preference. Windows 7 will have options to simply display such a message without requiring its users' participation, or only display a message when a setting is being changed. These options should help allay concerns of an overprotective operating system, while still providing superior protection against malicious coders.
2. Better integration with peripherals - More drivers will be supported, and Microsoft has upgraded the display that pops up when a device is connected. Whereas Vista and XP showed an autorun, Windows 7 will give more options that are built specifically around the device; a connected camera, for example, may offer a link to its manufacturer's website to check for more software.
4. Revised Taskbar - Windows 7 finally revises the task bar, the little icons in the bottom right hand corner of the XP/Vista screen that show you running programs and their attached annoying notifications. You can finally choose which icons you want to display, disabling unnecessary icons and putting an end to the notifications that tend to pop up at the most aggravating times possible. Instead of a little arrow that expands this section when too many icons are fighting for your attention, a little list of open programs pops up when you mouse over the area, showing you their icons and allowing you to deal with them.
2. Better integration with peripherals - More drivers will be supported, and Microsoft has upgraded the display that pops up when a device is connected. Whereas Vista and XP showed an autorun, Windows 7 will give more options that are built specifically around the device; a connected camera, for example, may offer a link to its manufacturer's website to check for more software.
3. Faster performance. Microsoft promises that Windows 7 will launch fewer services at start-up, and that those services will run in parallel, making for a faster boot-up sequence and a gener
ally more compact and efficient operating system. Additional performance boosts should make crashes less frequent than in Vista, although it won't be possible to gauge the success of these improvements until Windows 7 is finally released.
ally more compact and efficient operating system. Additional performance boosts should make crashes less frequent than in Vista, although it won't be possible to gauge the success of these improvements until Windows 7 is finally released.
4. Revised Taskbar - Windows 7 finally revises the task bar, the little icons in the bottom right hand corner of the XP/Vista screen that show you running programs and their attached annoying notifications. You can finally choose which icons you want to display, disabling unnecessary icons and putting an end to the notifications that tend to pop up at the most aggravating times possible. Instead of a little arrow that expands this section when too many icons are fighting for your attention, a little list of open programs pops up when you mouse over the area, showing you their icons and allowing you to deal with them.
Saturday, January 31, 2009
How to fix "Windows XP could not start the following is missing or corrupt"
 A corrupt registry is the usual headaches for most of the computer users. Registry is an important part of your Windows operating system, it is what we call the central space. It stores all data on your PC, then a small error can cause big
problems.
Yesterday I was called to repair a friends PC, because his PC receives an error when he tries to start Windows XP. He thinks of reformatting the PC but has chosen to call me first to seek advice. Below is the error, he receives when loading Windows XP. Luckily I was able to rescue him from formatting his PC.
Use the procedures that you can follow to be able to restore a corrupted registry, and usually start up again on Windows XP. The procedures below also applies to the following registry key errors.
- Windows XP could not start because the following file is missing or corrupt: \ WINDOWS \ system32 \ config \ system
- Windows XP could not start because the following file is missing or corrupt: \ WINDOWS \ system32 \ config \ software
- Stop: c0000218 (Registry File Failure) The registry administrator can not load the hive (file): \ SystemRoot \ System32 \ Config \ SOFTWARE or its log or alternate.
To fix registry errors, you need Windows XP Recovery Console. You can start from a Windows XP CD or boot directly to the Recovery Console.
Follow these steps to boot into Windows XP Recovery Console
- Put your Windows XP CD-ROM drive
- Restart your computer, make sure that your BIOS is set to boot from CD
- When you see the "Press any key to boot from CD ..." press the space bar or any key.
- Wait until you see the "Welcome to Setup" screen, press R to start the Recovery Console
- Choose the Windows installation that you want to load
- Enter password and press Enter
- You should now be at C: \ Windows> prompt
- Repair Copy files via Recovery Console
If your Windows installation is on another drive you replace the drive letter in the procedure below.
At the Recovery Console command prompt, type the following lines and press ENTER after each line:
md tmp
copy c: \ Windows \ system32 \ config \ system c: \ windows \ tmp \ system.bak
copy c: \ Windows \ system32 \ config \ software c: \ windows \ tmp \ software.bak
copy c: \ Windows \ system32 \ config \ sam c: \ windows \ tmp \ sam.bak
copy c: \ Windows \ system32 \ config \ security c: \ windows \ tmp \ security.bak
copy c: \ Windows \ system32 \ config \ default c: \ windows \ tmp \ default.bak
delete the C: \ Windows \ system32 \ config \ system
delete the C: \ Windows \ system32 \ config \ software
delete the C: \ Windows \ system32 \ config \ Sam
delete the C: \ Windows \ system32 \ config \ security
delete the C: \ Windows \ system32 \ config \ default
copy c: \ windows \ repair \ system c: \ Windows \ system32 \ config \ system
copy c: \ windows \ repair \ software c: \ Windows \ system32 \ config \ software
copy c: \ windows \ repair \ Sam C: \ Windows \ system32 \ config \ Sam
copy c: \ windows \ repair \ security c: \ Windows \ system32 \ config \ security
copy c: \ windows \ repair \ default c: \ Windows \ system32 \ config \ default
Quit Recovery Console by typing "exit." When the computer restarts, press F8 and then select Safe Mode
Restart in Safe Mode and a Recent Snapshot Backup
Restart the computer in Safe Mode by pressing F8 during the initial bootup and select Safe Mode. Once in Safe Mode, make sure the files and folders are visible so you can access them. Follow these instructions to achieve this.
- Open My Computer
- Click the Tools menu and then click Folder Options.
- Click the View tab.
- Under Hidden files and folders, click to select Show hidden files and folders, and then click to clear the Hide protected operating system files (Recommended) check box.
- Click Yes when the dialog box that confirms that you want to display these files appears.
_restore (EE42BEB8-700A-495F-8004-53D26C2E12C5)You may receive an Access Denied error message when trying to access the System Volume Information folder.
C: \ System Volume Information is not available. Access is denied.You received this error message because you are logged into folder that does not have permissions set on the folder. To correct this, please follow the instructions in Microsoft Knowledge Base article 309531 to access and continue.
Once you have access to snapshots, use the following instructions to copy one of the latest snapshots for Windows \ TMP folder, so you have access to it.
- The System Volume Information folder, click View, then click Details to display the date of each snapshot folder.
- Open a folder that was created at the current time, but rather before the problem began.
- Open Snapshot subfolder
- Check the following files and copy and paste them into C: \ Windows \ TMP folder
- _REGISTRY_USER_.DEFAULT
- _REGISTRY_MACHINE_SECURITY
- _REGISTRY_MACHINE_SOFTWARE
- _REGISTRY_MACHINE_SYSTEM
- _REGISTRY_MACHINE_SAM
- Rename the files that you just copied into the C: \ Windows \ TMP folder.
- Rename _REGISTRY_USER_.DEFAULT to DEFAULT
- Rename _REGISTRY_MACHINE_SECURITY for security
- Rename _REGISTRY_MACHINE_SOFTWARE software
- Rename _REGISTRY_MACHINE_SYSTEM for system
- Rename _REGISTRY_MACHINE_SAM to SAM
- When your done rename files, restart your computer again with the Recovery Console
Replace Repair files with a current backup of the Registry
In the Recovery Console again, type the following commands at the prompt to replace the files with a current backup. You must press ENTER after each command.
Part C: \ Windows \ system32 \ config \ Sam
Part C: \ Windows \ system32 \ config \ security
Part C: \ Windows \ system32 \ config \ software
Part C: \ Windows \ system32 \ config \ default
Part C: \ Windows \ system32 \ config \ system
copy c: \ windows \ tmp \ software c: \ Windows \ system32 \ config \ software
copy c: \ windows \ tmp \ system c: \ Windows \ system32 \ config \ system
copy c: \ windows \ tmp \ Sam C: \ Windows \ system32 \ config \ Sam
copy c: \ windows \ tmp \ security c: \ Windows \ system32 \ config \ security
copy c: \ windows \ tmp \ default c: \ Windows \ system32 \ config \ default
Once the files have been changed, type exit at the command prompt to restart Windows in Normal mode.
Using System Restore to return to a good Backup Point
Because there is more to a System Restore than just the registry files, follow these steps to restore your computer to a good backup point.
- Click Start, then click All Programs.
- Click on Accessories, then click System Tools.
- Click System Restore, and then click Restore to a previous restore point and finish the restore process.
Tuesday, January 27, 2009
Microsoft Internet Explorer Navigation Keyboard Shortcuts:

• CTRL+B (Open the Organize Favorites dialog box)
• CTRL+E (Open the Search bar)
• CTRL+F (Start the Find utility)
• CTRL+H (Open the History bar)
• CTRL+I (Open the Favorites bar)
• CTRL+L (Open the Open dialog box)
• CTRL+N (Start another instance of the browser with the same Web address)
• CTRL+O (Open the Open dialog box, the same as CTRL+L)
• CTRL+P (Open the Print dialog box)
• CTRL+R (Update the current Web page)
• CTRL+W (Close the current window)
Microsoft Management Console (MMC) Main Window Keyboard Shortcuts:
• CTRL+O (Open a saved console)
• CTRL+N (Open a new console)
• CTRL+S (Save the open console)
• CTRL+M (Add or remove a console item)
• CTRL+W (Open a new window)
• F5 key (Update the content of all console windows)
• ALT+SPACEBAR (Display the MMC window menu)
• ALT+F4 (Close the console)
• ALT+A (Display the Action menu)
• ALT+V (Display the View menu)
• ALT+F (Display the File menu)
• ALT+O (Display the Favorites menu)
MMC Console Window Keyboard Shortcuts:
• CTRL+P (Print the current page or active pane)
• ALT+Minus sign (-) (Display the window menu for the active console window)
• SHIFT+F10 (Display the Action shortcut menu for the selected item)
• F1 key (Open the Help topic, if any, for the selected item)
• F5 key (Update the content of all console windows)
• CTRL+F10 (Maximize the active console window)
• CTRL+F5 (Restore the active console window)
• ALT+ENTER (Display the Properties dialog box, if any, for the selected item)
• F2 key (Rename the selected item)
• CTRL+F4 (Close the active console window. When a console has only one console window, this shortcut closes the console)
Remote Desktop Connection Navigation:
• CTRL+ALT+END (Open the Microsoft Windows NT Security dialog box)
• ALT+PAGE UP (Switch between programs from left to right)
• ALT+PAGE DOWN (Switch between programs from right to left)
• ALT+INSERT (Cycle through the programs in most recently used order)
• ALT+HOME (Display the Start menu)
• CTRL+ALT+BREAK (Switch the client computer between a window and a full screen)
• ALT+DELETE (Display the Windows menu)
• CTRL+ALT+Minus sign (-) (Place a snapshot of the entire client window area on the Terminal server clipboard and provide the same functionality as pressing ALT+PRINT SCREEN on a local computer.)
• CTRL+ALT+Plus sign (+) (Place a snapshot of the active window in the client on the Terminal server clipboard and provide the same functionality as pressing PRINT SCREEN on a local computer).
• CTRL+N (Open a new console)
• CTRL+S (Save the open console)
• CTRL+M (Add or remove a console item)
• CTRL+W (Open a new window)
• F5 key (Update the content of all console windows)
• ALT+SPACEBAR (Display the MMC window menu)
• ALT+F4 (Close the console)
• ALT+A (Display the Action menu)
• ALT+V (Display the View menu)
• ALT+F (Display the File menu)
• ALT+O (Display the Favorites menu)
MMC Console Window Keyboard Shortcuts:
• CTRL+P (Print the current page or active pane)
• ALT+Minus sign (-) (Display the window menu for the active console window)
• SHIFT+F10 (Display the Action shortcut menu for the selected item)
• F1 key (Open the Help topic, if any, for the selected item)
• F5 key (Update the content of all console windows)
• CTRL+F10 (Maximize the active console window)
• CTRL+F5 (Restore the active console window)
• ALT+ENTER (Display the Properties dialog box, if any, for the selected item)
• F2 key (Rename the selected item)
• CTRL+F4 (Close the active console window. When a console has only one console window, this shortcut closes the console)
Remote Desktop Connection Navigation:
• CTRL+ALT+END (Open the Microsoft Windows NT Security dialog box)
• ALT+PAGE UP (Switch between programs from left to right)
• ALT+PAGE DOWN (Switch between programs from right to left)
• ALT+INSERT (Cycle through the programs in most recently used order)
• ALT+HOME (Display the Start menu)
• CTRL+ALT+BREAK (Switch the client computer between a window and a full screen)
• ALT+DELETE (Display the Windows menu)
• CTRL+ALT+Minus sign (-) (Place a snapshot of the entire client window area on the Terminal server clipboard and provide the same functionality as pressing ALT+PRINT SCREEN on a local computer.)
• CTRL+ALT+Plus sign (+) (Place a snapshot of the active window in the client on the Terminal server clipboard and provide the same functionality as pressing PRINT SCREEN on a local computer).
Microsoft Natural Keyboard Shortcuts:


Windows Logo (Display or hide the Start menu)
• Windows Logo+BREAK (Display the System Properties dialog box)
• Windows Logo+D (Display the desktop)
• Windows Logo+M (Minimize all of the windows)
• Windows Logo+SHIFT+M (Restore the minimized windows)
• Windows Logo+E (Open My Computer)
• Windows Logo+F (Search for a file or a folder)
• CTRL+Windows Logo+F (Search for computers)
• Windows Logo+F1 (Display Windows Help)
• Windows Logo+ L (Lock the keyboard)
• Windows Logo+R (Open the Run dialog box)
• Windows Logo+U (Open Utility Manager)
Accessibility Keyboard Shortcuts:
• Right SHIFT for eight seconds (Switch FilterKeys either on or off)
• Left ALT+left SHIFT+PRINT SCREEN (Switch High Contrast either on or off)
• Left ALT+left SHIFT+NUM LOCK (Switch the MouseKeys either on or off)
• SHIFT five times (Switch the StickyKeys either on or off)
• NUM LOCK for five seconds (Switch the ToggleKeys either on or off)
• Windows Logo +U (Open Utility Manager)
Windows Explorer Keyboard Shortcuts:
• END (Display the bottom of the active window)
• HOME (Display the top of the active window)
• NUM LOCK+Asterisk sign (*) (Display all of the subfolders that are under the selected folder)
• NUM LOCK+Plus sign (+) (Display the contents of the selected folder)
• NUM LOCK+Minus sign (-) (Collapse the selected folder)
• LEFT ARROW (Collapse the current selection if it is expanded, or select the parent folder)
• RIGHT ARROW (Display the current selection if it is collapsed, or select the first subfolder)
Windows Keyboard Shortcuts
General Keyboard Shortcuts:
• CTRL+C (Copy)
• CTRL+X (Cut)
• CTRL+V (Paste)
• CTRL+Z (Undo)
• DELETE (Delete)
• SHIFT+DELETE (Delete the selected item permanently without placing the item in the Recycle Bin)
• CTRL while dragging an item (Copy the selected item)
• CTRL+SHIFT while dragging an item (Create a shortcut to the selected item)
• F2 key (Rename the selected item)
• CTRL+RIGHT ARROW (Move the insertion point to the beginning of the next word)
• CTRL+LEFT ARROW (Move the insertion point to the beginning of the previous word)
• CTRL+DOWN ARROW (Move the insertion point to the beginning of the next paragraph)
• CTRL+UP ARROW (Move the insertion point to the beginning of the previous paragraph)
• CTRL+SHIFT with any of the arrow keys (Highlight a block of text)
• SHIFT with any of the arrow keys (Select more than one item in a window or on the desktop, or select text in a document)
• CTRL+A (Select all)
• F3 key (Search for a file or a folder)
• ALT+ENTER (View the properties for the selected item)
• ALT+F4 (Close the active item, or quit the active program)
• ALT+ENTER (Display the properties of the selected object)
• ALT+SPACEBAR (Open the shortcut menu for the active window)
• CTRL+F4 (Close the active document in programs that enable you to have multiple documents open simultaneously)
• ALT+TAB (Switch between the open items)
• ALT+ESC (Cycle through items in the order that they had been opened)
• F6 key (Cycle through the screen elements in a window or on the desktop)
• F4 key (Display the Address bar list in My Computer or Windows Explorer)
• SHIFT+F10 (Display the shortcut menu for the selected item)
• ALT+SPACEBAR (Display the System menu for the active window)
• CTRL+ESC (Display the Start menu)
• ALT+Underlined letter in a menu name (Display the corresponding menu)
• Underlined letter in a command name on an open menu (Perform the corresponding command)
• F10 key (Activate the menu bar in the active program)
• RIGHT ARROW (Open the next menu to the right, or open a submenu)
• LEFT ARROW (Open the next menu to the left, or close a submenu)
• F5 key (Update the active window)
• BACKSPACE (View the folder one level up in My Computer or Windows Explorer)
• ESC (Cancel the current task)
• SHIFT when you insert a CD-ROM into the CD-ROM drive (Prevent the CD-ROM from automatically playing)
Dialog Box Keyboard Shortcuts:
• CTRL+TAB (Move forward through the tabs)
• CTRL+SHIFT+TAB (Move backward through the tabs)
• TAB (Move forward through the options)
• SHIFT+TAB (Move backward through the options)
• ALT+Underlined letter (Perform the corresponding command or select the corresponding option)
• ENTER (Perform the command for the active option or button)
• SPACEBAR (Select or clear the check box if the active option is a check box)
• Arrow keys (Select a button if the active option is a group of option buttons)
• F1 key (Display Help)
• F4 key (Display the items in the active list)
• BACKSPACE (Open a folder one level up if a folder is selected in the Save As or Open dialog box)
• CTRL+C (Copy)
• CTRL+X (Cut)
• CTRL+V (Paste)
• CTRL+Z (Undo)
• DELETE (Delete)
• SHIFT+DELETE (Delete the selected item permanently without placing the item in the Recycle Bin)
• CTRL while dragging an item (Copy the selected item)
• CTRL+SHIFT while dragging an item (Create a shortcut to the selected item)
• F2 key (Rename the selected item)
• CTRL+RIGHT ARROW (Move the insertion point to the beginning of the next word)
• CTRL+LEFT ARROW (Move the insertion point to the beginning of the previous word)
• CTRL+DOWN ARROW (Move the insertion point to the beginning of the next paragraph)
• CTRL+UP ARROW (Move the insertion point to the beginning of the previous paragraph)
• CTRL+SHIFT with any of the arrow keys (Highlight a block of text)
• SHIFT with any of the arrow keys (Select more than one item in a window or on the desktop, or select text in a document)
• CTRL+A (Select all)
• F3 key (Search for a file or a folder)
• ALT+ENTER (View the properties for the selected item)
• ALT+F4 (Close the active item, or quit the active program)
• ALT+ENTER (Display the properties of the selected object)
• ALT+SPACEBAR (Open the shortcut menu for the active window)
• CTRL+F4 (Close the active document in programs that enable you to have multiple documents open simultaneously)
• ALT+TAB (Switch between the open items)
• ALT+ESC (Cycle through items in the order that they had been opened)
• F6 key (Cycle through the screen elements in a window or on the desktop)
• F4 key (Display the Address bar list in My Computer or Windows Explorer)
• SHIFT+F10 (Display the shortcut menu for the selected item)
• ALT+SPACEBAR (Display the System menu for the active window)
• CTRL+ESC (Display the Start menu)
• ALT+Underlined letter in a menu name (Display the corresponding menu)
• Underlined letter in a command name on an open menu (Perform the corresponding command)
• F10 key (Activate the menu bar in the active program)
• RIGHT ARROW (Open the next menu to the right, or open a submenu)
• LEFT ARROW (Open the next menu to the left, or close a submenu)
• F5 key (Update the active window)
• BACKSPACE (View the folder one level up in My Computer or Windows Explorer)
• ESC (Cancel the current task)
• SHIFT when you insert a CD-ROM into the CD-ROM drive (Prevent the CD-ROM from automatically playing)
Dialog Box Keyboard Shortcuts:
• CTRL+TAB (Move forward through the tabs)
• CTRL+SHIFT+TAB (Move backward through the tabs)
• TAB (Move forward through the options)
• SHIFT+TAB (Move backward through the options)
• ALT+Underlined letter (Perform the corresponding command or select the corresponding option)
• ENTER (Perform the command for the active option or button)
• SPACEBAR (Select or clear the check box if the active option is a check box)
• Arrow keys (Select a button if the active option is a group of option buttons)
• F1 key (Display Help)
• F4 key (Display the items in the active list)
• BACKSPACE (Open a folder one level up if a folder is selected in the Save As or Open dialog box)
Difference between IPv4 vs IPv6
Introduction::
IPv4 is currently the dominant Internet Protocol version, and was the first to receive widespread use.
IPv4 is currently the dominant Internet Protocol version, and was the first to receive widespread use.
The Internet Engineering Task Force (IETF) has designated IPv6 as the successor to version 4 for general use on the Internet. It significantly increases the size of the address space used to identify communication endpoints in the Internet, thereby allowing it to continue its tremendous growth rate.
IPv6 is also said to be IPng (IP Next Generation).
Limitations in IPv4:
Up to now we are using IPv4.IPv4 was remarkably but in spite of that it is beginning to have problems. Most importantly, there is a growing shortage of IPv4 addresses, which are needed by all new machines added to the Internet.
The limited address range forces organizations to use Network Address Translation (NAT) firewalls to map multiple private addresses to a single public IP address.NATs does not support standards-based network-layer security and also creates complicated barriers to VoIP, and other services.
Security was also an issue for IPv4. Although there are lots of ways of encrypting IPv4 traffic, such as using the IPSec protocol, but unfortunately all of the IPv4 encryption methods are proprietary and no real standard encryption methods exist.
IPv6 Features:
The IPv6 header has a new header format that is designed to minimize header overhead. This optimization is achieved by moving both non-essential fields and optional fields to extension headers that appear after the IPv6 header. Intermediate routes can process the streamlined IPv6 header more efficiently. IPv4 headers and IPv6 headers do not interoperate. IPv6 is not a superset of functionality, that is backward compatible with IPv4 is not possible. A host or router must use an implementation of both IPv4 and IPv6 to recognize and process both header formats. The IPv6 header is only twice as large as the IPv4 header, even though IPv6 addresses are four times as large as IPv4 addresses.
IPv4
IPv6 is also said to be IPng (IP Next Generation).
Limitations in IPv4:
Up to now we are using IPv4.IPv4 was remarkably but in spite of that it is beginning to have problems. Most importantly, there is a growing shortage of IPv4 addresses, which are needed by all new machines added to the Internet.
The limited address range forces organizations to use Network Address Translation (NAT) firewalls to map multiple private addresses to a single public IP address.NATs does not support standards-based network-layer security and also creates complicated barriers to VoIP, and other services.
Security was also an issue for IPv4. Although there are lots of ways of encrypting IPv4 traffic, such as using the IPSec protocol, but unfortunately all of the IPv4 encryption methods are proprietary and no real standard encryption methods exist.
IPv6 Features:
The IPv6 header has a new header format that is designed to minimize header overhead. This optimization is achieved by moving both non-essential fields and optional fields to extension headers that appear after the IPv6 header. Intermediate routes can process the streamlined IPv6 header more efficiently. IPv4 headers and IPv6 headers do not interoperate. IPv6 is not a superset of functionality, that is backward compatible with IPv4 is not possible. A host or router must use an implementation of both IPv4 and IPv6 to recognize and process both header formats. The IPv6 header is only twice as large as the IPv4 header, even though IPv6 addresses are four times as large as IPv4 addresses.
- IPv6 features a larger address space than that of IPv4.
- IPv6 offers a higher level of built-in security, and it has been specifically designed with mobile devices in mind.
- Unlike mobile IPv4, Mobile IPv6 (MIPv6) avoids triangular routing and is therefore as efficient as normal IPv6.
- IPv6 can easily be extended by adding extension headers after the IPv6 header.
- IPv4 limits packets to 64 KB of payload. IPv6 has optional support for packets over this limit, referred to as jumbograms, which can be as large as 4 GB.
- The use of jumbograms may improve performance over high-MTU networks. The presence of jumbograms is indicated by the Jumbo Payload Option header
- IPv6 also includes standardized support for QoS.
IPv4
- Source and destination addresses are 32 bits (4 bytes) in length.
- IPSec support is optional.
- IPv4 header does not identify packet flow for QoS handling by routers.
- Both routers and the sending host fragment packets.
- Header includes a checksum.
- Header includes options.
- Address Resolution Protocol (ARP) uses broadcast ARP Request frames to resolve an IP address to a link-layer address.
- Internet Group Management Protocol (IGMP) manages membership in local subnet groups.
- ICMP Router Discovery is used to determine the IPv4 address of the best default gateway, and it is optional.
- Broadcast addresses are used to send traffic to all nodes on a subnet.
- Must be configured either manually or through DHCP.
- Uses host address (A) resource records in Domain Name System (DNS) to map host names to IPv4 addresses.
- Uses pointer (PTR) resource records in the IN-ADDR.ARPA DNS domain to map IPv4 addresses to host names.
- Must support a 576-byte packet size.
- Source and destination addresses are 128 bits (16 bytes) in length.
- IPSec support is required.
- IPv6 header contains Flow Label field, which identifies packet flow for QoS handling by router.
- Only the sending host fragments packets; routers do not.
- Header does not include a checksum.
- All optional data is moved to IPv6 extension headers.
- Multicast Neighbor Solicitation messages resolve IP addresses to link-layer addresses.
- Multicast Listener Discovery (MLD) messages manage membership in local subnet groups.
- ICMPv6 Router Solicitation and Router Advertisement messages are used to determine the IP address of the best default gateway, and they are required.
- IPv6 uses a link-local scope all-nodes multicast address.
- Does not require manual configuration or DHCP.
- Uses host address (AAAA) resource records in DNS to map host names to IPv6 addresses.
- Uses pointer (PTR) resource records in the IP6.ARPA DNS domain to map IPv6 addresses to host names.
- Must support a 1280-byte packet size .
Monday, January 26, 2009
About Intel Core i7 i7-965 Processor

Intel Core i7 i7-965 Processor
(3.2GHz, 4x1MB, 6.4GT/s QPI, LGA1366 Socket B - MPN: BX80601965) Price Range: $1,019.99 - $1,122.67 from 10 Sellers
Description: The Intel Core i7 processor features a 4-core, 8 software thread design with Intel Hyper-Threading Technology. Combined with Intel Turbo Boost technology, which accelerates the processor to match your workload, you'll get incredible performance no matter what your computing needs.| Description: | Core i7 i7-965 Quad Core Processor | |
| Manufacturer: | Intel | |
| Lowest Price: | $1,019.99 | |
| User Reviews: | Not Rated | |
| Rebates: | (None) | |
 | Quick Glance | |
| Intel Core i7 | ||
| Intel Socket B (LGA 1336) | ||
| 4 | ||
| 6.4 GT/s | ||
| 3200 | ||
| ||
| ||
| ||
| ||
| ||
Subscribe to:
Posts (Atom)
